In the realm of operating systems, Ubuntu has become immensely popular for its user-friendly interface and compatibility with a wide range of devices.
Let's delve into the world of dual-boot systems and discover how you can easily set up Ubuntu alongside Windows on your PC.
Minimum System Requirements to Install Ubuntu
To install Ubuntu alongside Windows, your computer must meet the following minimum system requirements:
- A 2 GHz dual-core processor
- 4 GB of RAM
- 25 GB of hard drive space
- VGA capable of 1024x768 screen resolution
It is recommended to allocate a minimum of 10 GB to your Ubuntu install. You can drag the divider left and right to choose how you want to divide your hard drive space between the two operating systems during the installation process.
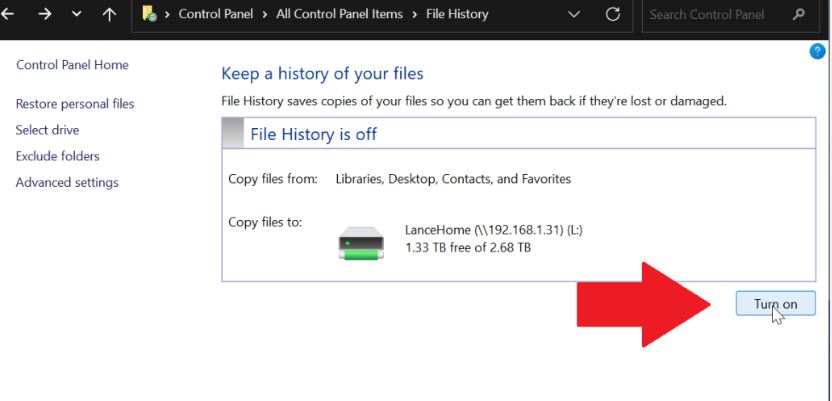
Back Up Your Data in Windows
You can follow these steps:
- Open the Control Panel by clicking on the Start button and selecting "Control Panel" from the menu.
- In the Control Panel, click on the "System and Security" category.
- Under the "System and Security" category, click on "Backup and Restore."
- In the Backup and Restore window, you will see the option to "Set up backup" or "Change settings." Click on the appropriate option.
- If you are setting up a backup for the first time, Windows will prompt you for an external storage device such as an external hard drive or a network location where you want to store your backup.
Connect your external storage device and select it as the backup destination. - Once you have selected the backup destination, you will be presented with options to choose what to back up.
You can either let Windows choose for you, which will include all your personal files and system images, or you can select individual files and folders to include in the backup. - After selecting the files and folders to back up, click on "Next" and review your backup settings. You can also set up a backup schedule by clicking the "Change schedule" link.
- Once you are satisfied with your backup settings, click on the "Save settings and run backup" button to initiate the backup process.
- Windows will now start backing up your selected files and folders to the specified destination. The time it takes will depend on the amount of data being backed up.
- You can monitor the progress of the backup in the Backup and Restore window. Once the backup is complete, you will see a notification.
Back up your data using Acronis True Image in Windows
1. Launch the Acronis True Image program on your computer.
2. On the home screen, click on the "Backup" option.
3. Select the files and folders you want to back up. You can either choose specific files or select entire drives or partitions.
4. Choose the destination where you want to store your backup. This can be an external hard drive, a network location, cloud storage, or any other storage device.
5. Customize the backup settings if needed. Acronis True Image offers various options like scheduling backups, setting up automatic backups, encryption, and more.
6. Click on the "Back up now" button to start the backup process.
7. Acronis True Image will create an image file containing your selected data and save it to the chosen destination.
8. Once the backup is complete, you can verify its integrity by restoring a file or folder from the backup.
9. It is recommended to create regular backups to ensure your data is always protected. You can set up automatic backups or manually initiate backups whenever you deem necessary.

Download the Ubuntu ISO File
You can download the latest version of Ubuntu, Ubuntu 23.10, from the official website. The recommended system requirements are the same as for Ubuntu 22.04 LTS.
Please note that you will need to create a DVD or a USB drive to install it. The non-LTS versions are supported for nine months and guarantee all the latest features.
Creating a Bootable USB Drive
To install Ubuntu, you'll need a bootable USB drive.
You can create a bootable USB drive using available tools such as Rufus, Etcher or Unetbootin.
Here are the steps to create a bootable USB drive for Ubuntu with Rufus:
- Download the latest version of Rufus.
- Insert the USB drive into your computer.
- Open Rufus and select the USB drive from the “Device” dropdown menu.
- Under “Boot selection”, click on “Select” and browse to the location where you saved the Ubuntu ISO file.
- Ensure that the “Partition scheme” is set to “MBR” and the “File system” is set to “FAT32”.
- Click on “Start” to begin the process of creating a bootable USB drive.
- Wait for the process to complete. This may take several minutes.
- Once the process is complete, you can eject the USB drive and use it to install Ubuntu.
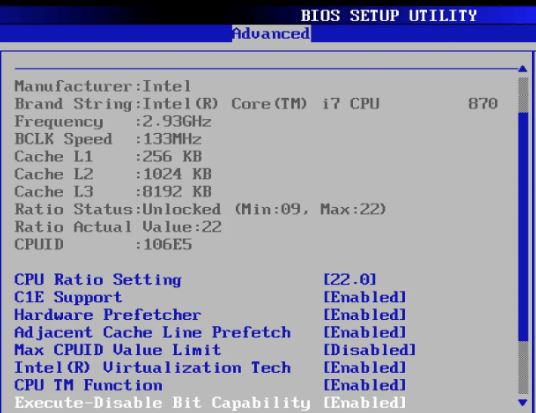
Adjusting BIOS Settings:
To install Ubuntu alongside Windows, you need to adjust your computer’s BIOS settings. Here are the steps to do so:
-
Restart your computer: Save any open files and restart your computer.
-
Enter the BIOS: During the boot process, press the key that corresponds to your computer’s BIOS setup utility. This is usually F2, F10, or Del. The key may vary depending on your computer’s manufacturer.
-
Disable Secure Boot: In the BIOS setup utility, navigate to the Security tab and disable Secure Boot. This is necessary to install Ubuntu alongside Windows.
-
Enable Legacy Boot: In the BIOS setup utility, navigate to the Boot tab and enable Legacy Boot. This will allow your computer to boot from a USB drive.
-
Save and exit: Save your changes and exit the BIOS setup utility.
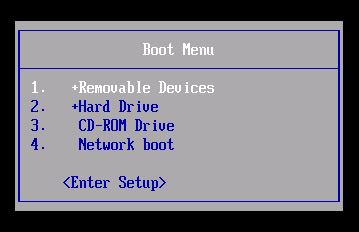
Boot from the USB drive
Insert the USB drive into your computer and restart your computer.
During the boot process, press the key that corresponds to your computer’s boot menu. This is usually F12, F11, or F8. The key may vary depending on your computer’s manufacturer.
Select the boot device: Use the arrow keys to select the USB drive that contains the Ubuntu installer.
Installing Ubuntu
Once you have created a bootable USB drive using Rufus or any other software of your choice, you can follow the on-screen instructions to install Ubuntu alongside Windows. Here are the steps:
- On the installation screen, select "Install Ubuntu" and proceed to the next step.
- In the installation type screen, choose "Something else" and click on the "Continue" button.
- In the partitioning tool, you will see a list of existing partitions on your disk. Identify the Windows partition (usually labeled as NTFS) and the free space you have on your disk.
- Select the free space and click on the "+" button to create a new partition for Ubuntu.
- In the "Create partition" dialog, choose the size for your Ubuntu partition. A recommended size is at least 20 GB, more if you plan to install additional software or store large files.
- Select the partition type as "Primary", the file system as "Ext4 journaling file system", and the mount point as "/" which is the root directory of Ubuntu.
- Click "OK" to create the partition.
- If you want to allocate additional space for a separate home partition, repeat steps 5-8 for the desired size, but set the mount point as "/home".
- Once you have created the necessary partitions, select the partition for Ubuntu (and optionally the home partition) and click on "Install Now" to proceed with the installation.
- Choose your preferred language, keyboard layout, and click "Continue".
- If you want to install any third-party software (e.g., multimedia codecs), you can select the option and click "Continue".
- Configure your username, password, and other settings, and click "Continue".
- Wait for the installation process to complete.
- Finally, click on "Restart Now" to boot into your newly installed Ubuntu system.
Post-Installation Procedures
Once Ubuntu is successfully installed, there are a few post-installation procedures worth considering.
This section will cover essential tasks such as updating Ubuntu, installing device drivers, configuring network settings, and installing additional software packages.
Setting Default Boot Options
To choose between Ubuntu and Windows every time you start your computer, it's important to configure the default boot options.
Configure the default boot options and personalize your dual-boot setup, follow these steps:
1. Open Ubuntu and launch the Terminal.
- You can do this by pressing Ctrl+Alt+T or searching for "Terminal" in the activities or applications menu.
2. In the Terminal, enter the following command to open the Grub configuration file in a text editor:
sudo gedit /etc/default/grub
3. You'll be prompted to enter your password. After providing it, the Grub configuration file will open.
4. Locate the line that starts with "GRUB_DEFAULT" and update the value to set your preferred default operating system. The numbering starts from 0, with 0 being the first entry in the Grub menu.
- For example, if you want Ubuntu to be the default OS, set the value to "0".
- If you want Windows to be the default OS, set the value to "2" (assuming Windows is the third entry in the Grub menu).
5. To change the timeout duration (the time to wait before the default OS is automatically selected), find the line starting with "GRUB_TIMEOUT" and modify the value. The default is usually 10 seconds. You can reduce it if you want a quicker boot or increase it for more time to make a selection.
6. Optionally, you can also change the appearance and behavior of the Grub menu. There are different settings you can modify in the configuration file, such as the background image, resolution, and more. Make the desired changes.
7. Once you've made the necessary changes, save the file and close the text editor.
8. In the Terminal, enter the following command to update the Grub bootloader with the new configuration:
sudo update-grub
9. Restart your computer to apply the changes.
After restarting, you should see the modified default operating system, timeout duration, and other options in the Grub menu. The selected default OS will launch automatically once the timeout expires or if no selection is made during that time.
By customizing these settings, you can personalize your dual-boot setup and make it more convenient for your needs.
Troubleshooting Common Installation Issues
Installation processes can sometimes encounter hurdles.
1. Partitioning Challenges:
- Ensure that you have enough free space on your hard drive to create a new partition.
- Use the Windows Disk Management tool to shrink an existing partition and create free space for Ubuntu.
- If you encounter any errors during partitioning, try using a different partitioning tool like GParted.
- Make sure to choose the correct partition type (e.g., ext4) for Ubuntu during installation.
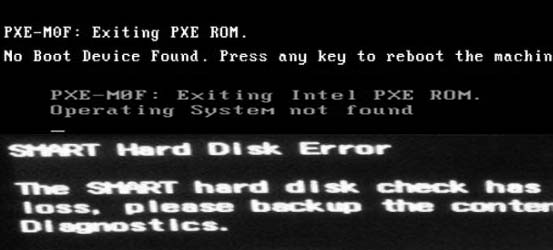
2. Bootloader Errors:
- If you receive an "Operating System not found" error after installing Ubuntu, it may be due to a bootloader issue.
- Use a boot repair tool like Boot-Repair to fix bootloader problems. You can create a Boot-Repair live USB or use it directly from a Ubuntu live CD/DVD.
- If you're using UEFI firmware, ensure that both Windows and Ubuntu are installed in UEFI mode to avoid conflicts.
3. Dual Booting Time Conflict:
- Sometimes, after dual booting Ubuntu with Windows, the time in Ubuntu may be incorrect.
- To fix this, disable the "Set time automatically" option in Windows, and manually set the time in Ubuntu to match the correct time zone.
4. GRUB Bootloader Issues:
- If you encounter issues with the GRUB bootloader (e.g., unable to boot into Ubuntu), try reinstalling GRUB using the Boot-Repair tool mentioned earlier.
- You can also use the Ubuntu Live USB and run the following commands in a terminal:
   sudo add-apt-repository ppa:yannubuntu/boot-repair

   sudo apt-get update

   sudo apt-get install -y boot-repair

   boot-repair
5. Secure Boot Problems:
- If you have Secure Boot enabled in your BIOS settings, it may prevent Ubuntu from booting.
- Disable Secure Boot in your BIOS settings to allow Ubuntu to boot properly.
- Ensure that you are using a signed version of Ubuntu to work with Secure Boot.
6. Installation Freezing or Hanging:
- If the installation freezes or hangs at any point, try rebooting your system and reinstalling Ubuntu.
- Make sure to use a reliable and error-free installation media, such as a USB or DVD, and check its integrity before installation.
7. Graphics Driver Issues:
- If you experience problems with your graphics driver after installing Ubuntu alongside Windows, try updating your graphics driver.
- Use the Additional Drivers tool in Ubuntu to check for and install any available proprietary graphics drivers for your hardware.
Conclusion
By following this step-by-step guide, installing Ubuntu alongside Windows becomes a simple and rewarding experience.
With dual-boot capability, you can seamlessly switch between the two operating systems, enjoying the best of both worlds. Embrace the versatility and compatibility of Ubuntu, and unlock a world of endless possibilities on your PC.